- collaboration
 Invite Team Members
- Assign Projects
- Users & Role Management
- Review Management [Test Cases]
- Review Management [Elements]
- Execution Controls
- test cases
- Test Cases
- Test Case List Actions
- Import and Export Test Cases
- Import Test Project Test Cases
- Importing Postman Collections and Environments
- Test cases for Desktop Windows
- Update Test Case result in a Test Plan
- Test cases for Mobile Web Application
- Test Step Types
- Type: Natural Language
- Type: REST API
- Type: Step Group
- Type: For Loop
- Type: While Loop
- Type: Block
- Type: If Condition
- Nested Step Groups
- Create Test Steps
- Image Injection
- Cross-application testing
- Test Data Types
- Raw
- Parameter
- Runtime
- Random
- Data Generator
- Phone Number
- Mail Box
- Environment
- Concat Test Data
- Create Test Data [Parameter]
- Update Test Data Profile
- Updating Value in TDP
- Import TDP
- Bulk Deletion of a Test Data Profile
- Create Test Data [Environment]
- Elements (Objects)
- Web Applications
- Record Multiple Elements
- Record Single Element
- Create Elements
- Supported Locator Types
- Formulating Elements
- Shadow DOM Elements
- Verifying elements in Chrome DevTools
- Handling iframe Elements?
- Dynamic Locators using Parameter
- Dynamic Locators using Runtime
- Using Environment Test Data for Dynamic locators
- Import/Export Elements
- AI Enabled Auto-Healing
- test step recorder
- Install Chrome Extension
- Install Firefox Extension
- Install Edge Extension
- Exclude Attributes/Classes
- test plans
- Add, Edit, Delete Test Machines
- Add, Edit, Delete Test Suites
- Schedule Test Plans
- Run Test Suites In Parallel
- Cross Browser Testing
- Distributed Testing
- Headless Testing
- Test Lab Types
- Disabling Test Cases in Test Plans
- AfterTest Case
- Post Plan Hook
- AfterTest Suite
- Email Configuration in Test Plan
- Execute Partial Test Plans via API
- Ad-hoc Run
- Test Plan Executions
- Dry Runs on Local Devices
- Run Tests on Vendor Platforms
- Run Test Plans on Local Devices
- Test Locally Hosted Applications
- Debug Test Case Failures
- Parallel and Allowed queues
- debugging
- Debug results on local devices (Web applications)
- Debug Results on Local Devices
- Launch Debugger in the Same Window
- Testsigma Agent
- Pre-requisites
- Setup: Windows, Mac, Linux
- Setup: Android Local Devices
- Setting up iOS Local Devices
- Update Agent Manually
- Update Drivers Manually
- Delete Corrupted Agent
- Triggering Tests on Local Devices
- troubleshooting
- Agent - Startup and Registration Errors
- Fetching Agent logs
- Upgrade Testsigma Agent Automatically
- Testsigma Agent - FAQs
- continuous integration
- Test Plan Details
- REST API (Generic)
- Jenkins
- Azure DevOps
- AWS DevOps
- AWS Lambda
- Circle CI
- Bamboo CI
- Travis CI
- CodeShip CI
- Shell Script(Generic)
- Bitrise CI
- GitHub CICD
- Bitbucket CICD
- GitLab CI/CD
- desired capabilities
- Most Common Desired Capabilities
- Browser Console Debug Logs
- Geolocation Emulation
- Bypass Unsafe Download Prompt
- Geolocation for Chrome & Firefox
- Custom User Profile in Chrome
- Emulate Mobile Devices (Chrome)
- Add Chrome Extension
- Network Throttling
- Network Logs
- Biometric Authentication
- Enable App Resigning in iOS
- Enable Capturing Screenshots (Android & iOS)
- Configure Android WebViews
- Incognito/Private mode
- Set Google Play Store Credentials
- addons
- What is an Addon?
- Addons Community Marketplace
- Install Community Addon
- Prerequisites(Create/Update Addon)
- Create an Addon
- Update Addon
- Addon Types
- Create a Post Plan Hook add-on in Testsigma
- Create OCR Text Extraction Addon
- configuration
- API Keys
- Security(SSO)
- Setting Up Google Single Sign-On(SSO) Login in Testsigma
- Setting Up Okta Single Sign-On Integration with SAML Login in Testsigma
- Setting up SAML-based SSO login for Testsigma in Azure
- iOS Settings
- Creating WDA File for iOS App Testing
- uploads
- Upload Files
- Upload Android and iOS Apps
- How to generate mobile builds for Android/iOS applications?
- Testsigma REST APIs
- Environments
- Elements
- Test Plans
- Upload Files
- Get Project wide information
- Upload and update test data profile
- Trigger Multiple Test Plans
- Trigger Test Plan remotely and wait until Completion
- Run the same Test Plan multiple times in Parallel
- Schedule, Update and Delete a test plan using API
- Update Test Case results using API
- Create and update values of Test Data Profile using REST API
- Rerun Test Cases from Run Results using API
- open source dev environment setup
- macOS and IntelliJ Community Edition
- macOS and IntelliJ Ultimate Edition
- Windows and IntelliJ Ultimate Edition
- Setup Dev Environment [Addons]
- NLPs
- Unable to retrieve value stored in text element
- Unable to capture dropdown element
- Unable to Select Radiobutton
- Unable to Click Checkbox
- setup
- Server Docker Deployment Errors
- Secured Business Application Support
- Troubleshooting Restricted Access to Testsigma
- Why mobile device not displayed in Testsigma Mobile Test Recorder?
- Unable to create new test session due to unexpected error
- web apps
- URL not accessible
- Test Queued for a Long Time
- Issues with UI Identifiers
- Missing Elements in Recorder
- Collecting HAR File
- mobile apps
- Failed to Start Mobile Test Recorder
- Troubleshooting “Failed to perform action Mobile Test Recorder” error
- Test Execution State is Queued for a Long Time
- Mobile app keeps stopping after successful launch
- More pre-requisite settings
- Unable to start WDA Process on iPhone
- Most Common causes for Click/Tap NLP failure
- Finding App Package & App Activity (Android)
- on premise setup
- On-Premise Setup Prerequisites
- On-Premise Setup with Docker-compose File
- Post-Installation Checklist for On-Premise Setup
- Install Docker on an Unix OS in Azure Infrastructure
- SMTP Configuration in Testsigma
- Configure Custom Domains
- salesforce testing
- Intro: Testsigma for Salesforce Testing
- Creating a Connected App
- Creating a Salesforce Project
- Creating Metadata Connections
- Adding User Connections
- Build Test Cases: Manual+Live
- Salesforce Element Repositories
- Intro: Testsigma Special NLPs
Update browser drivers for Testsigma agent manually
During a local execution, Testsigma agent communicates with the Web Browser installed on your machine using the driver files specific to the respective browser. Driver files for all the popular browser versions are included in Testsigma Agent automatic updates.
Why is updating the browser driver files necessary?
Sometimes, the update fails, due to bad network conditions or Firewall restrictions. You might need to manually download the driver files specific to your Web Browser and Operating System and place them in the correct directory within the Testsigma Agent directory.
Location of driver files
Driver files are located under the following directories for the different Web Browsers:
- Google Chrome: < TestsigmaAgentDirectory >/drivers/googlechrome
- Edge: < TestsigmaAgentDirectory >/drivers/edge
- Mozilla Firefox: < TestsigmaAgentDirectory >/drivers/mozilla
- InternetExplorer: < TestsigmaAgentDirectory >/drivers/internetexplorer
The InternetExplorer folder is present only for Windows version of the Agent
Downloading the driver files
When new browser versions are released, a newer driver version will be released on SeleniumHQ Downloads page.
And here are the direct links to WebDrivers of the most popular Browsers:
- Firefox - GeckoDriver (Hosted on Github)
- Chrome - ChromeDriver (Hosted on Google Sites)
- Microsoft Internet Explorer - InternetExplorerDriver
- Microsoft Edge - Edge Driver
Adding drivers manually
We just need to download the corresponding file from the above link and place it in the correct directory.
For example, let us assume that the installed version of the Google Chrome browser is v93 and a new version v94 is released today. When a new Browser version is released, a new browser driver version will also be released shortly.
In case the recent Agent update didn’t include driver v94, we need to do the following steps to add the browser driver manually:
- Download the driver file for v94 from the above link.
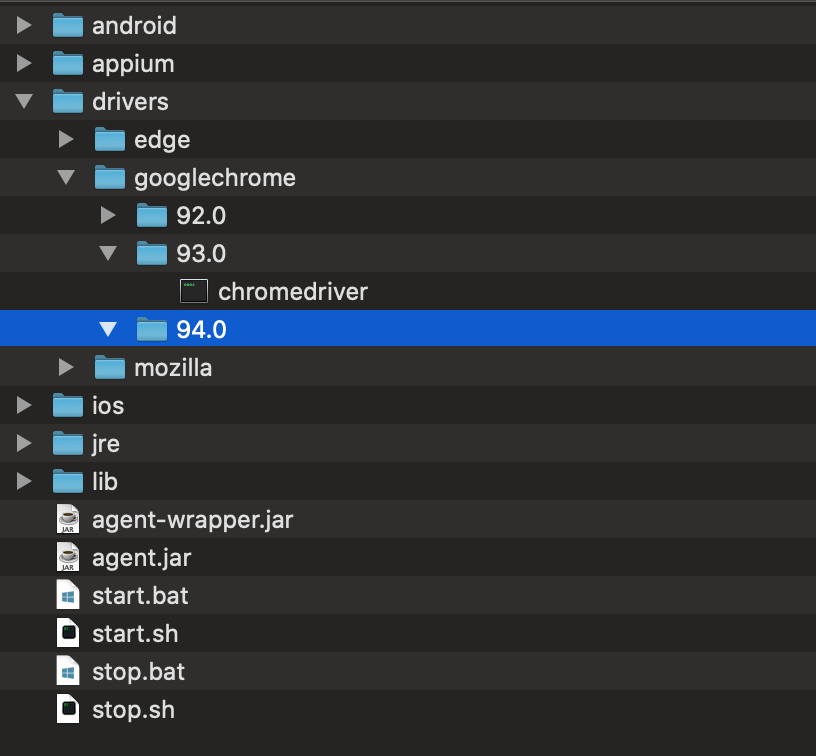
- Check if a folder named ‘94.0’ is present in the corresponding browser folder i.e googlechrome in this case within the drivers folder. If not present, create a directory named 94.0 there.
Here’s a screenshot of the Agents folder for Testsigma Agent in Mac OS:
In the case of the Firefox Browser driver, the folder names follow a certain pattern where 0.x.x is renamed as 0.xx
For example, if the browser driver version is 0.29.1, the driver folder name within Testsigma Agent should be ‘0.291’.
Similarly, for browser driver version 0.29.0, the driver folder name should be 0.290
- Place the downloaded driver file in the newly created folder. The driver file will have a .exe extension for Windows and no extension for Linux/Mac.
You can skip the next section to the end if you are on Windows Machine.
Additional steps for Mac or Linux
Apart from the above steps, there are some additional steps to be performed to avoid permission issues in Mac or Linux. This is due to the presence of executable bit permission for Unix-based Operating Systems.
After placing the downloaded driver in the newly created folder, we need to perform the following steps:
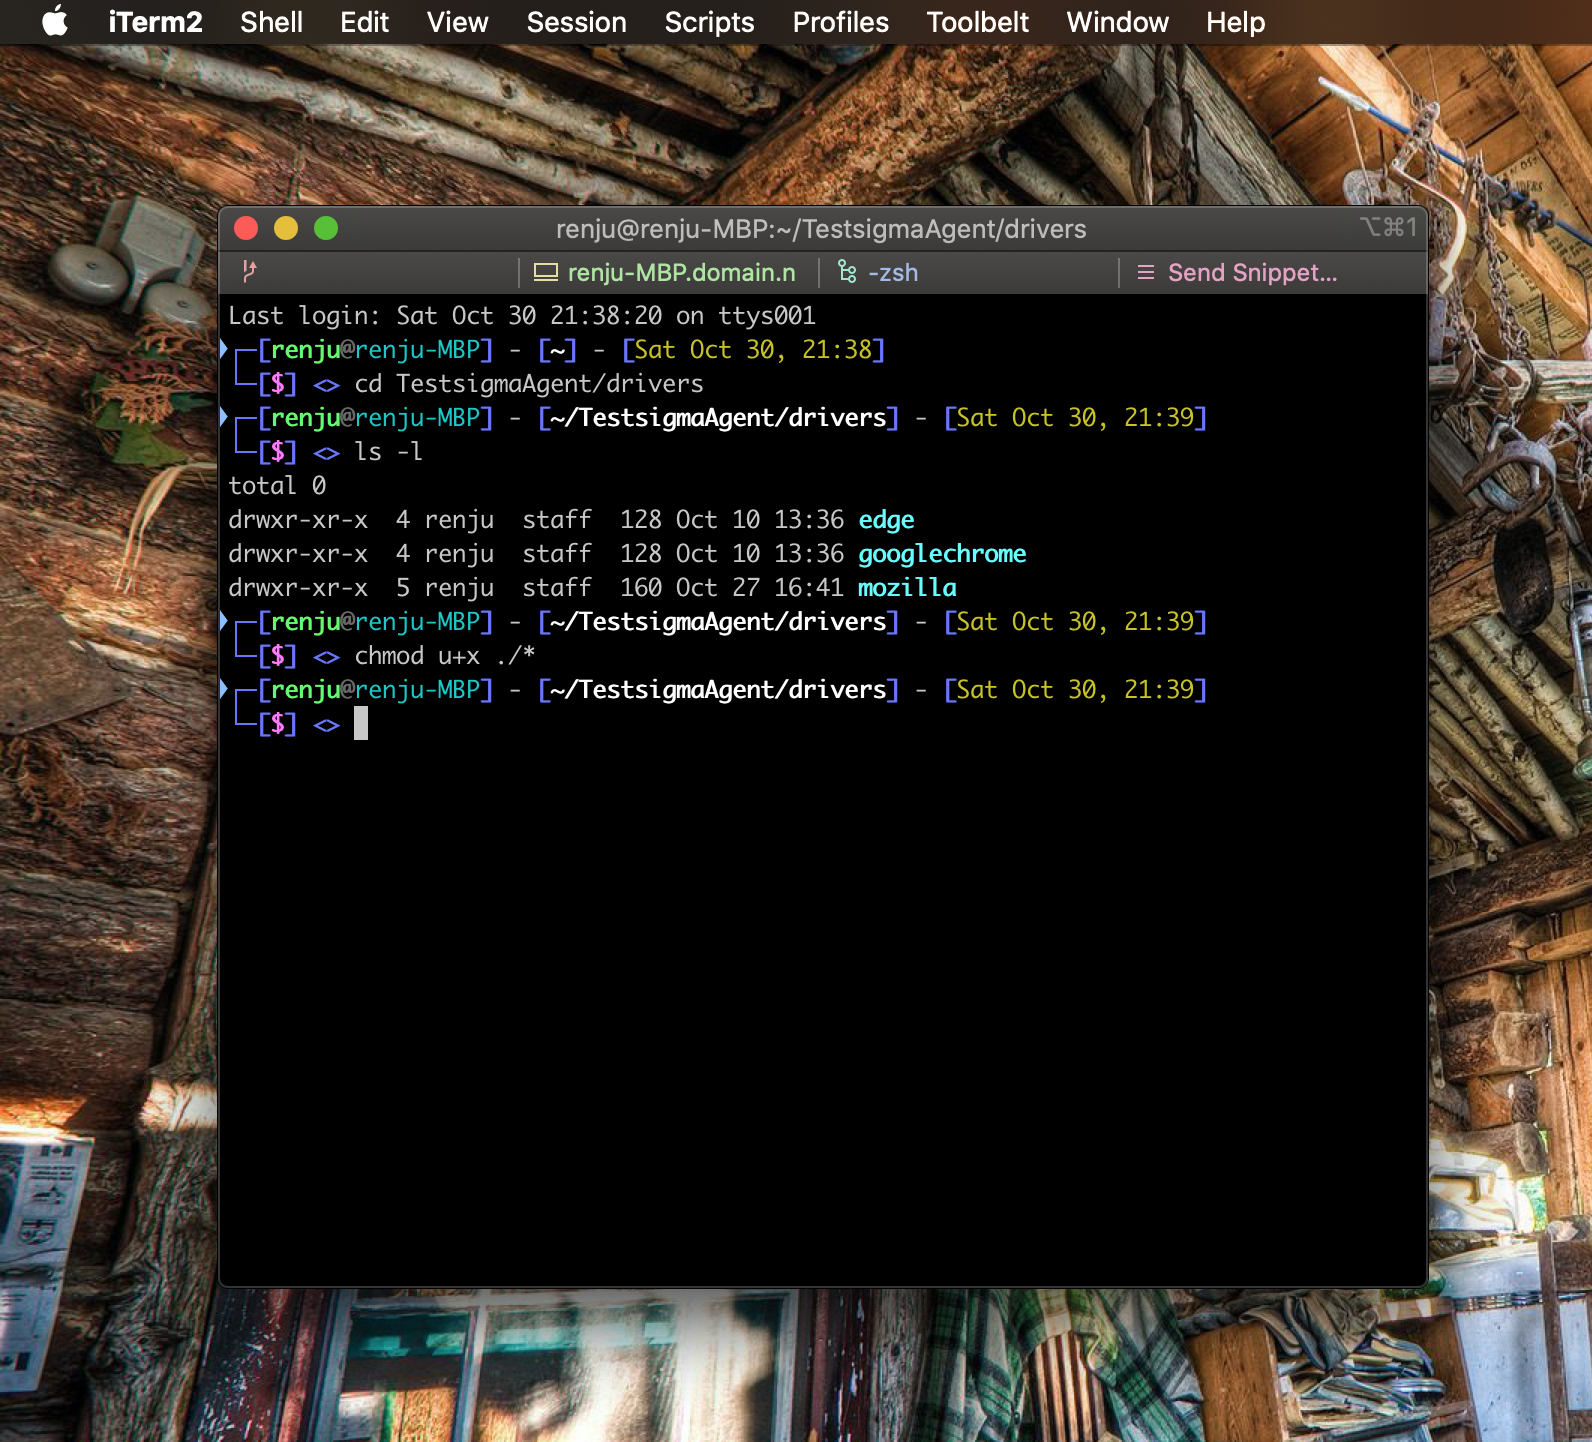
- Open Terminal and navigate to the drivers folder. cd /Users/renju/TestsigmaAgent/drivers
- Run the below command to add executable permission to all the driver files including the newly added driver file chmod -R u+x ./*
Once that is done, you can start executing tests on the newest version of the corresponding Browser. You can follow the same directions for other browsers as well.